在 Unity 使用 AssetBundles 實作簡易的遊戲資源打包以及更新機制
Unity 官方之前在 Asset Store 上有分享 AssetBundle Manager,並提供官方教學文章介紹 AssetBundle 載入機制,我們參考該教學以及範例,因應遊戲設計考量,自己使用 Unity 提供的底層 AssetBundle API,製作 AssetBundle 載入機制,來完成動態更新遊戲資源的功能。
以下紀錄我們如何在 Unity 中,使用 AssetBundle 建置遊戲資源包,並且實作一個簡易的遊戲更新機制。並提供給我們工作團隊參考以及教學使用。
什麼是 AssetBundle
AssetBundle 為資源的集合,可包含貼圖 (Textures),材質 (Materials),聲音 (Audio),動畫資源 (Animation Clips & Animator controllers),文字 (Text assets),甚至場景 (Scenes) 等各式資源,允許遊戲在執行階段向遠端伺服器 (Remote server),要求載入 AssetBundle 並且使用裡頭的資源。
因此可以利用 AssetBundle 功能來製作關卡更新資源包,下載新的關卡資源,即是 DLC (Downloadable content)。亦可用來更新遊戲,例如特殊節慶時,更新遊戲貼圖材質,讓遊戲與玩家一同過節。
最常使用 AssetBundle 機制莫過於是手機遊戲,手機遊戲發布 APP 平臺 (e.g. Google Play & Apple Store) 有容量限制,使用 AssetBundle 機制切分遊戲程式框架與遊戲資源,讓玩家先下載安裝容量小的 APP,遊戲開始前再下載遊戲資源,有效達到遊戲 APP 容量減量。
唯一注意的是,AssetBundle 無法包含程式碼,即是沒辦法使用 AssetBundle 做到程式碼更新,意味著改遊戲資源時,玩家重新下載 AssetBundles 即可。但若是修改遊戲程式解臭蟲時,得重新發布 APP 到 APP 平臺,讓玩家重新下載更新其遊戲 APP。
要如何做到新遊戲內容不改程式碼,如何設計程式碼成合適的組件 (Components),讓關卡企劃可以用既有的程式組件,新增/ 調整參數就能兜出新內容 (e.g. 新關卡),這又是另一個很長的故事了…。
範例遊戲專案介紹
本文提到的範例遊戲專案共分成五個場景
- Main,起始場景,載入畫面
- UI,遊戲 UI 資源,恆存在遊戲中
- Menu,起始關卡選擇頁,恆存在遊戲中
- Level1,關卡1
- Level2,關卡2
其遊戲流程:
- 起始場景 Main,加載場景 UI 以及 Menu
- 加載場景,
UnityEngine.SceneManagement.SceneManager.LoadSceneAsync()
- 加載場景,
- Menu 控制流程開始運作,隱藏 Main 場景或是移除該場景釋放其資源
- 等待玩家在 Menu 選擇遊戲關卡
- 加載對應關卡的場景 (e.g. Level1 or Level2) 進行遊戲,流程控制切換給關卡,隱藏 Menu 場景
- 關卡結束,移除關卡場景並釋放其資源,Menu 流程重新開始運作
- 移除場景,
UnityEngine.SceneManagement.SceneManager.UnloadSceneAsync() - 強制 GC,
System.GC.Collect()
- 移除場景,
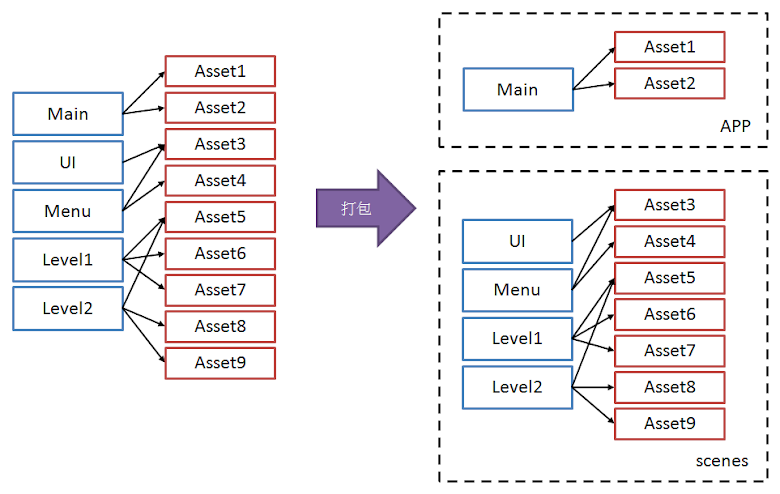
在這文章中記錄並介紹一種簡易打包資源包的方式,主遊戲程式僅包含 Main 場景以及其相依資源,其他場景以及其相依資源另外打包在一個 AssetBundle。
因應這樣的場景打包方式,遊戲流程只需要微微調整即可。在遊戲流程1–加載 UI & Menu 場景前,必須先載入那一包 AssetBundle,包含場景資源以及相依的遊戲資源到記憶體中,然後一切流程造舊,依照上述的遊戲流程進行遊戲。(如何載入請參考 載入 AssetBundles)。
撰寫簡易的 AssetBundle 建置流程 (Build pipeline)
#if UNITY_EDITOR
using System.Collections.Generic;
using System.Linq;
using System.IO;
using UnityEditor;
using UnityEngine;

public static class BuilderExample
{
   [MenuItem("Tools/Build Windows64")]
   static void  BuildWindows64()
   {
      var path = Path.GetFullPath(Application.dataPath + "/../Builds/Windows64/" + Application.productName + ".exe");
      BuildProject(path, BuildTarget.StandaloneWindows64);
   }

   [MenuItem("Tools/Build Android")]
   static void BuildAndroid()
   {
      var path = Path.GetFullPath(Application.dataPath + "/../Builds/Android/" + Application.productName + ".apk");
      BuildProject(path, BuildTarget.Android);
   }

   const string AssetBundleExtension = ".assetbundle";
   const string ScenesAssetBundleName = "scenes";

   static string GetEntryScenePath()
   {
      return EditorBuildSettings.scenes.Where(v => v.enabled).Select(v => v.path).First();
   }

   static string[] CollectScenesPathWithoutEntry()
   {
      var paths = new List<string>(EditorBuildSettings.scenes.Where(v => v.enabled).Select(v => v.path));
      paths.RemoveAt(0);
      return paths.ToArray();
   }

   static void BuildProject(string outputPath, BuildTarget target = BuildTarget.Android, BuildOptions buildOptions = BuildOptions.None , BuildAssetBundleOptions buildAssetBundleOptions = BuildAssetBundleOptions.None)
   {
      // Check output path
      var bundleOutputDir = Path.GetFullPath(Path.GetDirectoryName(outputPath));
      var playerOutputPath = outputPath;

      if (!Directory.Exists(bundleOutputDir))
      {
         Directory.CreateDirectory(bundleOutputDir);
      }

      // Collect & Build assetbundles
      var bundleManifestPath = bundleOutputDir + Path.DirectorySeparatorChar + Path.GetFileName(bundleOutputDir) + ".manifest";
      var assetBundleBuilds = new AssetBundleBuild[] {
         new AssetBundleBuild {
            assetBundleName = ScenesAssetBundleName + AssetBundleExtension,
            assetNames = CollectScenesPathWithoutEntry(),
         }
      };

      BuildPipeline.BuildAssetBundles(bundleOutputDir, assetBundleBuilds, buildAssetBundleOptions, target);

      // Build Player
      var buildPlayerOptions = new BuildPlayerOptions()
      {
         target = target,
         scenes = new string[] { GetEntryScenePath() },
         options = buildOptions,
         locationPathName = playerOutputPath,
         assetBundleManifestPath = bundleManifestPath,
      };

      var result = BuildPipeline.BuildPlayer(buildPlayerOptions);
      if (!string.IsNullOrEmpty(result))
      {
         throw new System.Exception(result);
      }

      // Open folder if not batch mode
      if (!UnityEditorInternal.InternalEditorUtility.inBatchMode)
      {
         System.Diagnostics.Process.Start(bundleOutputDir);
      }
   }
}
#endif
- Line 10-15,建立 MenuItem 以及建置專案範例
- Line 24,AssetBundle 建置附檔名,可依照團隊喜好調整
- Line 27-30,取得初始場景的路徑,這邊使用 System.Linq 減少程式複雜度
- Line 32-37,取得非初始場景的路徑
- Line 42-48,計算輸出路徑,並建置資料夾 (如果不存在的話)
- Line 51,計算 AssetBundle Manifest 位置,該 Manifest 會記錄本次所有建置 AssetBundles 的名稱以及之間相依性
- Line 52,設定 AssetBundle 建置資料,在這個範例中,我們僅建立一個 AssetBundle
- Line 68,設定 AssetBundle Manifest 位置,若 Unity 找不到或是無法載入該 AssetBundle Manifest 路徑,會將所有遊戲資源 (Assets) 包到 APP 中
- Line 78-81,建置成功開啟建置資料夾,BatchMode 不開啟該資料夾 (e.g. 使用 CLI 介面建置遊戲專案)
點選 MenuItem Tools/Build Android,便可執行該 Script 便可打包 AssetBundle (scenes.assetbundle) 以及 APP,如何載入 AssetBundle 請參考載入 AssetBundles。至於為什麼 AssetBundle 要給予副檔名 .assetbundle,主因是部分 Web server (e.x. IIS,
Apache 等等) 若檔案沒有副檔名,將無法在設定檔正確加入 MIME 對應 (application/octet-stream),導致該檔案無法被存取,所以給予副檔名 。
雖然這樣便可完成資源包的打包機制,但將所有資源都放在同一包 AssetBundle 的做法顯然不是很聰明,如果只是要更新其中一張貼圖,玩家得整包 AssetBundle 重新下載,這會使得玩家每次更新都得重新下載一次整包的遊戲資源,導致遊戲體驗會變得很差,也會因為大量下載流量,增加伺服器流量負擔。
因此在打包資源包時,應該考慮 Unity 所提供的 AssetBundleName 機制,讓開發者依照資源屬性,例如其資源使用方式或是場景資訊,設定資源 AssetBundleName,根據該 AssetBundleName 將遊戲資源包成多個 AssetBundles,若有更新只重新下載該資源的 AssetBundle 即可,玩家不用整個遊戲資源全部重新下載。這部分放在下篇文章進行說明。
載入 AssetBundle
從 Unity 文件中,使用 UnityWebRequest 從遠端伺服器下載 AssetBundle,不使用 WWW 這個舊的機制:
UnityWebRequest.GetAssetBundle(url);
UnityWebRequest.GetAssetBundle(url, hash);
UnityWebRequest.GetAssetBundle(url, hash, crc);
若想要讓 Unity 幫忙處理本地快取 (Local Caching),則需要提供檔案的 Hash,該 AssetBundle 的 Hash 以及 CRC 可以從建置後的檔案 scenes.assetbundle.manifest 中拿到,例如以下範例,CRC 為 2328136099,Hash 為 5bb3afa2d797c66295e590e4579f5dab:
ManifestFileVersion: 0
CRC: 2328136099
Hashes:
  AssetFileHash:
    serializedVersion: 2
    Hash: 5bb3afa2d797c66295e590e4579f5dab
  TypeTreeHash:
    serializedVersion: 2
    Hash: 31d6cfe0d16ae931b73c59d7e0c089c0
HashAppended: 0
ClassTypes: []
Assets:
- Assets/Scenes/UI.unity
- Assets/Scenes/Menu.unity
- Assets/Scenes/Level1.unity
- Assets/Scenes/Level2.unity
Dependencies: []
抑或是呼叫 Unity API 來取得:
uint crc;
Hash128 hash;

UnityEditor.BuildPipeline.GetCRCForAssetBundle(path, out crc);
UnityEditor.BuildPipeline.GetHashForAssetBundle(path, out hash);
因此可以寫出一個簡單載入 AssetBundle 的範例,這個範例中不使用 CRC 來檢查資源包是否正確:
using System.Collections;
using UnityEngine;
using UnityEngine.Networking;

public class LoaderExample : MonoBehaviour
{
   IEnumerator Start()
   {
      // Load AssetBundle
      var url = @"http://example.com/scenes.assetbundle";
      var hash = Hash128.Parse("5bb3afa2d797c66295e590e4579f5dab");

      yield return this.StartCoroutine(this.LoadAssetBundleCoroutine(url, hash));

      // TODO: Load scenes
   }

   IEnumerator LoadAssetBundleCoroutine(string url, Hash128 hash, uint crc = 0)
   {
      // Wait for caching ready
      while (!Caching.ready)
      {
         yield return null;
      }

      var httpRequest = UnityWebRequest.GetAssetBundle(url, hash, crc);
      {
         var op = httpRequest.Send();
         while (!op.isDone)
         {
            yield return null;
            // TODO: Show progress bar, op.progress
         }

         if (httpRequest.isError)
         {
            // TODO: Handle errors, httpRequest.error
         }
      }

      // MUST access property 'assetBundle' then you can load scene later
      var assetBundle = (httpRequest.downloadHandler as DownloadHandlerAssetBundle).assetBundle;
   }
}
- Line 13,CRC 設定為 0 表示不用 CRC 檢查下載的資源包是否正確
- Line 21,若要 Unity 處理 AssetBundle caching,必須先等 Caching 機制準備好
- Line 28-33,等待 AssetBundle 下載完成,處理進度條。若不處理進度條,可改用
yield return httpRequest.Send(); - Line 35-38,錯誤處理機制
- Line 42,必須存取 AssetBundle 之後才能載入 AssetBundle 中的場景
參考以上範例,修改原先遊戲初始場景中,加載後續場景的那段程式碼,先載入 AssetBundle 後再執行一般遊戲流程,載入接下來的場景,即可完成簡易的遊戲資源下載更新機制。
如何在編輯器測試載入流程
如此這樣的打包資源的方式,上節提到的 AssetBundle 加載機制在 Editor 中執行,如此一來開發者可依舊在 Editor中,一次多加載好幾個場景進行編輯開發。或是僅開啟初始場景 (Main.scene),來測試加載後續場景的流程。
若想要在 Editor 測試加載 AssetBundle 功能是否正確,執行步驟就會比較複雜許多,建議直接發布測試:
- 將打包後的 sceens.assetbundle 發佈到網站伺服器 (或是使用檔案路徑 file://C:/example/scenes.assetbundle)
- 開啟 Menu-item > File > Build Settings
- 設定 Scenes In Build 場景,僅留下起始場景,其他都取消建置
- 確認 AssetBundle 加載機制能夠執行
- 進入 Play Mode 執行測試
改用 AssetBundles 載入遊戲資源,發布遊戲執行上可能會遇到的問題
Q: 無法正常執行,Script error
A: 有開啟 Strip engine code 嗎?參考文章 Unity strip engine code 遇到執行不能之問題與解決,或是關閉 Strip engine code。
Q: 出現粉紅色色塊
Shader 載入失敗,參考文章 Unity AssetBundle 載入後,出現粉紅色區塊的問題與解決。
Q: 有沒有其他載入的範例
可參考後續整理的筆記 Unity Asserbundle 快取機制與載入範例。
系列文章
- Unity AssetBundle 快取機制與載入範例
- 在 Unity 使用 AssetBundles 實作簡易的遊戲資源打包以及更新機制
- 在 Unity 使用 AssetBundles 實作進階的遊戲資源打包以及更新機制
- Unity AssetBundle Variants 機制研究筆記
- Unity AssetBundle 資料列表載入以及打包架構思考,使用 Pokémon 作為範例


PokerStars - Gaming & Slots at Aprcasino
回覆刪除Join the 토토 사이트 fun at Aprcasino and play the best ventureberg.com/ of the best apr casino PokerStars casino games including Slots, Blackjack, Roulette, Video Poker and more!