如何在 Unity 中實作場景資源參照 (SceneAsset Reference)
社團中看到有人問如何建立場景參照 (Scene Reference),當改變場景檔案名稱時 (*.unity),其 Reference 不會消失的功能,激起一點好奇心研究。查看 Unity 本身沒有提供該功能,Unity 場景管理 (SceneManager) 都是靠場景的名稱字串來處理,唯一個可能可用的類別 SceneAsset,表示場景檔案的資源物件,但只能在 Editor 中使用…。
利用 Unity 現有工具以及 API,嘗試將場景參照的功能實作出來,紀錄問題解決流程以及範例程式碼。
使用 GUID 來追蹤場景
追蹤 Unity Asset 想到的唯一方法是使用 GUID,建立類別 (Class) 紀錄場景的 GUID 字串,之後能從該 GUID 字串取得場景名稱即可。
[System.Serializable]
public class SceneRef
{
   [SerializeField]
   string sceneGUID;

   public string GUID
   {
      get { return this.sceneGUID; }
      set { this.sceneGUID = value; }
   }

   public string SceneName
   {
      get
      {
            // TODO:
         throw new System.NotImplementedException();
      }
   }
}
在 Editor 中,可以使用 AssetDatabase.GUIDToAssetPath 從 GUID 取得資源路徑 (AssetPath),使用 AssetDatabase.LoadAssetAtPath<T> 將資源路徑取得資源實體 (Asset instance):
從 GUID 並可以追蹤到 SceneAsset,進而取得其場景名稱 (SceneName),抑或是使用 System.IO.Path.GetFileNameWithoutExtension 從場景的 AssetPath 取得場景名稱。但這些都只能在 Editor 進行操作,一旦發布遊戲專案後,這些功能通通不能用…。必須要另外想方法紀錄 GUID 以及 SceneName 的對應。
一種做法是在編輯階段,SceneRef 得同時記錄 GUID 以及 SceneName,在發布建置遊戲專案過程中,針對所有專案有使用到 SceneRef 的地方,全部更新 GUID 以及 SceneName 一次。但考慮不知道哪些資源使用到 SceneRef 的複雜性,應該將 GUID 以及 SceneName 的對應設定檔集中放在某處,發布建置遊戲專案只需要更新該設定檔,更新機制會顯得較為容易。
因此使用 ScriptableObject 建立設定檔,其中資料結構 SceneRefSettings.Scene 描述 GUID 以及 SceneName 的對應,考慮到載入場景也可以使用 BuildIndex,所以一併將場景的 BuildIndex 紀錄:
using UnityEngine;


public partial class SceneRefSettings : ScriptableObject
{
   [SerializeField]
   Scene[] scenes = new Scene[0];

   [System.Serializable]
   public class Scene
   {
      [SerializeField]
      string sceneName;

      [SerializeField]
      string sceneGUID;

      [SerializeField]
      int sceneBuildIndex;

      public string GUID
      {
         get { return this.sceneGUID; }
         internal set { this.sceneGUID = value; }
      }

      public string SceneName
      {
         get { return this.sceneName; }
         internal set { this.sceneName = value; }
      }

      public int BuildIndex
      {
         get { return this.sceneBuildIndex; }
         internal set { this.sceneBuildIndex = value; }
      }
   }
}
並且建立更新該設定檔的函數,抓取 EditorBuildSettings 的資料,在 Resources 資料夾中建立 Asset:
using System.Collections.Generic;

using UnityEngine;

#if UNITY_EDITOR
using System.IO;
using UnityEditor;
using UnityEngine.SceneManagement;
#endif

public partial class SceneRefSettings : ScriptableObject
{
   const string ResourceName = "SceneRef";
   const string ResourcePath = "Assets/Resources/" + ResourceName + ".asset";

#if UNITY_EDITOR
   public static void Build()
   {
      var scenes = new List<SceneRefSettings.Scene>();
      foreach (var s in EditorBuildSettings.scenes)
      {
         scenes.Add(new SceneRefSettings.Scene()
         {
             GUID = s.guid.ToString(),
             BuildIndex = SceneUtility.GetBuildIndexByScenePath(s.path),
             SceneName = Path.GetFileNameWithoutExtension(s.path),
         });
      }

      var data = ScriptableObject.CreateInstance<SceneRefSettings>();
      data.scenes = scenes.ToArray();

      var folder = Path.GetDirectoryName(Path.GetFullPath(ResourcePath));
      if (!Directory.Exists(folder))
      {
         Directory.CreateDirectory(folder);
      }

      AssetDatabase.CreateAsset(data, ResourcePath);
      AssetDatabase.SaveAssets();
      AssetDatabase.Refresh();
   }
#endif
}
之後建置 static function SceneRefSettings.GetScene,讓 SceneRef 能夠將 GUID 轉換成場景資料 SceneRefSettings.Scene,該結構中包含場景的 SceneName 以及 BuildIndex:
using UnityEngine;

#if UNITY_EDITOR
using System.IO;
using UnityEditor;
using UnityEngine.SceneManagement;
#endif

public partial class SceneRefSettings : ScriptableObject
{
   static SceneRefSettings current = null;

   public static Scene GetScene(string guid)
   {
#if UNITY_EDITOR
      if (!EditorApplication.isPlaying)
      {
         var path = AssetDatabase.GUIDToAssetPath(guid);
         if (string.IsNullOrEmpty(path))
         {
            return null;
         }

         return new Scene
         {
            GUID = guid,
            SceneName = Path.GetFileNameWithoutExtension(path),
            BuildIndex = SceneUtility.GetBuildIndexByScenePath(path),
         };
      }

      if (current == null)
      {
          // Always rebuild in play mode
          SceneRefSettings.Build();
      }
#endif

      if (current == null)
      {
         current = Resources.Load<SceneRefSettings>(ResourceName);

         if (current == null)
         {
            throw new System.InvalidOperationException("Cannnot load resource " + ResourceName);
         }
      }

      foreach (var s in current.scenes)
      {
         if (s.GUID == guid)
         {
             return s;
         }
      }

      return null;
   }
}
- Line 15-37:考慮到其他客製化 Editor 會使用到
SceneRef,針對 Editor 編輯模式 (Non-PlayMode) 下特別處理 - Line 32-36:Editor 模式下,進入 PlayMode 第一次取值時建立場景資訊
如此一來便可改寫 SceneRef,建立 SceneName 以及 BuildIndex 的屬性:
public partial class SceneRef
{
   public string SceneName
   {
      get
      {
         var s = this.Scene;
         return s == null ? string.Empty : s.SceneName;
      }
   }

   public int BuildIndex
   {
      get
      {
         var s = this.Scene;
         return s == null ? -2 : s.BuildIndex;
      }
   }

   // 判斷參照場景是否合法
   public bool IsValid
   {
      get
      {
         return this.Scene != null;
      }
   }

   SceneRefSettings.Scene Scene
   {
      get
      {
         return SceneRefSettings.GetScene(this.sceneGUID);
      }
   }
}
- Line 17:找不到場景回傳 -2,為了與 -1 區分,-1 表示該場景存在在 EditorBuildSettings 但沒有啟用 (disabled),表示該場景不打包進 Player 資源,而可能是採用 AssetBundle 方式載入
調整 Unity 編輯器,客製化編輯器
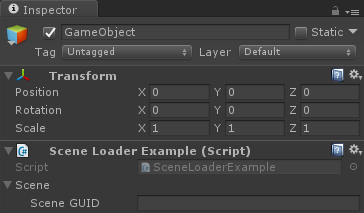
接著客製化 SceneRef 的編輯介面,預設的編輯介面是要求開發者設定 GUID,但這一點都不直覺不好用:
應該改成下面的選擇場景方式,讓開發者可以輕鬆從專案中選擇場景資源:
為了達到此目的,採用 PropertyDrawer 來建置 SceneRef 的編輯器。PropertyDrawer 可以用來客製化可序列化類別 (Serializable class) 的編輯器,或者是自訂屬性 (Attribute) 的編輯器。一旦為指定可序列化類別建立 PropertyDrawer 後,所有使用到該類別預設編輯器,就會變成由 PropertyDrawer 來繪製,而非 Unity 預設的那樣。更多請參考 PropertyDrawer。
using UnityEngine;
using UnityEditor;

[CustomPropertyDrawer(typeof(SceneRef))]
public class SceneRefPropertyDrawer : PropertyDrawer
{
   public override float GetPropertyHeight(SerializedProperty property, GUIContent label)
   {
      return EditorGUIUtility.singleLineHeight;
   }

   public override void OnGUI(Rect position, SerializedProperty property, GUIContent label)
   {
      var guidProperty = property.FindPropertyRelative("sceneGUID");

      EditorGUI.BeginProperty(position, label, property);

      var guid = guidProperty.stringValue;
      var path = AssetDatabase.GUIDToAssetPath(guid);
      var oldScene = AssetDatabase.LoadAssetAtPath<SceneAsset>(path);

      EditorGUI.BeginChangeCheck();
      var newScene = EditorGUI.ObjectField(position, label, oldScene, typeof(SceneAsset), false) as SceneAsset;
      if (EditorGUI.EndChangeCheck())
      {
         var newPath = AssetDatabase.GetAssetPath(newScene);
         var newGuid = AssetDatabase.AssetPathToGUID(newPath);
         guidProperty.stringValue = newGuid;
      }

      EditorGUI.EndProperty();
   }
}
建置前更新場景設定
最後,必須要在建置專案前呼叫 SceneRefSettings.Build(),確保場景以及 GUID 對應資料為最新,因此需要與 Unity 建置前事件掛鉤 (Hook pre-build),在 Unity 建置前撰寫程式呼叫更新 SceneRefSettings。從 Unity 官方文件中得知,可以繼承 IPreprocessBuild 來達到此目的:
using UnityEditor;
using UnityEditor.Build;

public class SceneRefBuildPreprocess : IPreprocessBuild
{
   public int callbackOrder
   {
      get
      {
         return 0;
      }
   }

   public void OnPreprocessBuild(BuildTarget target, string path)
   {
      SceneRefSettings.Build();
   }
}
如此一來便完成整個場景參考架構。
編輯器持續優化
- 在 Array 預設的顯示文字會是場景的 GUID 由於 Unity 預設會取得第一個序列化文字欄位,來當作陣列元素的 Label,因此會顯示場景的 GUID,不是很好讓開發者理解,因此調整編輯器改成顯示場景名稱。
if (label.text == guid && oldScene != null) { label = new GUIContent(oldScene.name); } var newScene = EditorGUI.ObjectField(position, label, oldScene, typeof(SceneAsset), false) as SceneAsset; - 加入場景建置檢查提示 檢查所設定的場景資源,是否有被加入到
EditorBuildSettings且該場景有被啟用建置,提示開發者這些場景記得要設定。詳細實作請參考完整程式碼。
程式使用範例
場景載入簡單範例:
using UnityEngine;
using UnityEngine.SceneManagement;

public class SceneLoaderExample : MonoBehaviour {
   [SerializeField]
   SceneRef[] scenes;

   void Start ()
   {
      foreach (var s in scenes)
      {
         if (s.IsValid)
         {
            SceneManager.LoadScene(s.SceneName, LoadSceneMode.Additive);
         }
         else
         {
            Debug.LogWarningFormat("Scene '{0}' is not in build settings", s.SceneName);
         }
      }
   }
}
完整專案程式碼
放置於 Github,可點擊下列連結檢視。


沒有留言: